
Position Library
Aircraft control
The Aircraft Control screen is a mix of Replay and Library related controls.
The most obvious control here is the dropdown list in the Main Control tab (Image 6) with all available memories. These are the positions in the current library. Each library may have up to 40 positions.
Selecting one and pressing the MOVE AIRCRAFT button will take you there.
If the position is too far away from our current position, flight simulator will have no ground or scenery loaded. In this case we will have to give it time to create it. If our program detects such a scenario, it will move the aircraft at a high altitude, wait for a preset amount of time and then move it to the desired final altitude.
The time required will vary from system to system, scenery and a few other parameters. You will have to trim this time from the options menu to best reflect your system. If this fails, your plane will be underground with somewhat comic results. when this happens, just press the move aircraft button again.
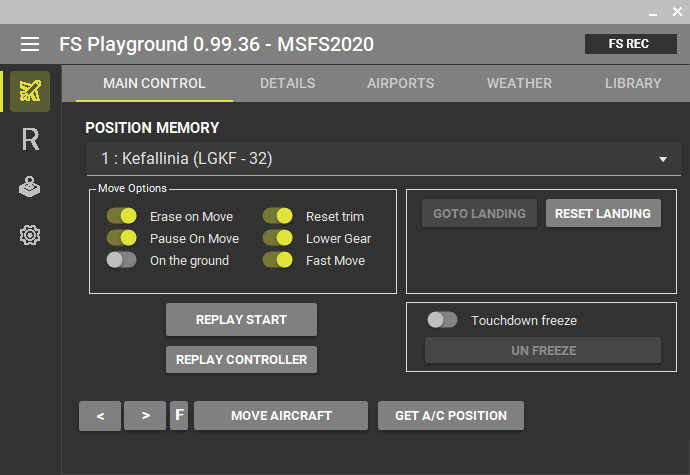
Main Control
In the Main Control tab of the you’ ll find the toggle switches and their operation mentioned bellow:
- The On the ground switch, when on, will move the aircraft on the ground.
- If the Reset trim switch is active, once you move the aircraft, it will zero out any trim on pitch and roll that the aircraft may have before moving.
- The Lower Gear switch will automatically lower the gear when moved. This is useful in some cases where the landing gear are retracted by the flight simulator when the plane is moved.
- The Fast move switch when active, uses an alternative, faster method to relocate the aircraft. It may cause issues when the plane is on the ground. In this case the move aircraft button may have to be clicked two or three times. It is still the preferred method and you should leave it enabled.
- The GOTO LANDING button will enter replay mode and once a landing has been detected, will move the time and pause on the very moment the plane touches the ground.
- The RESET LANDING button will erase the landing parameters. This reset will also happen automatically every time the move aircraft button is pressed.
- The text box shows the parameters of the last landing.
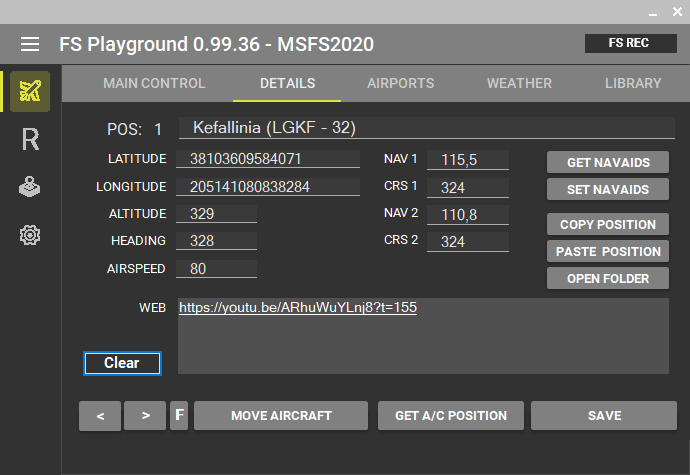
Details
In the DETAILS tab (Image 8) are information for the selected position memory. They can be modified either by hand or by getting the present plane position with the press of GET A/C POSITION button.
Also the navaids can be obtained by pressing the GET A/C NAVAIDS button, useful for ILS or other instrument based drills. They will be sent to the aircraft when you want it moved to this location.
One important entry is the web text box. Here any web link can be saved or other note that is related to this memory point. It is very interesting to see an actual aircraft landing and then try it on your own. By clicking on a link will launch a youtube video with a plane landing where your plane is about to land once you move your aircraft. The integration of Flight Simulator with the real world with such ease is a truly great feature.
Pressing the CLEAR button will erase the memory. Use with care.
In Flight Simulator
Once you are connected:
- Select a memory you want to update with the use of [<] and [>] buttons and move your aircraft there.
- Click on GET A/C POSITION button.
- Click on the MOVE AIRCRAFT button and it will take you there.
Another Way is to search for airports from the AIRPORTS tab (Image 9):
- Open the AIRPORTS tab.
- Start typing the ICAO code in the AIRPORT ID text box.
- The METAR button shows you the meteorological conditions of the selected airport.
- If the ON RUNWAY switch is on, the plane will be positioned on the runway.
- If not, with the DISTANCE FROM RWY text field you can set the distance of your aircraft from the airport and with the AIR SPEED text field you can set the air speed when you push the MOVE AIRCRAFT button and transport to the selected airport.
- When airport is found, you will get the available runways.
- DOUBLE CLICK on the one you want.
- Click on MOVE AIRCRAFT button.
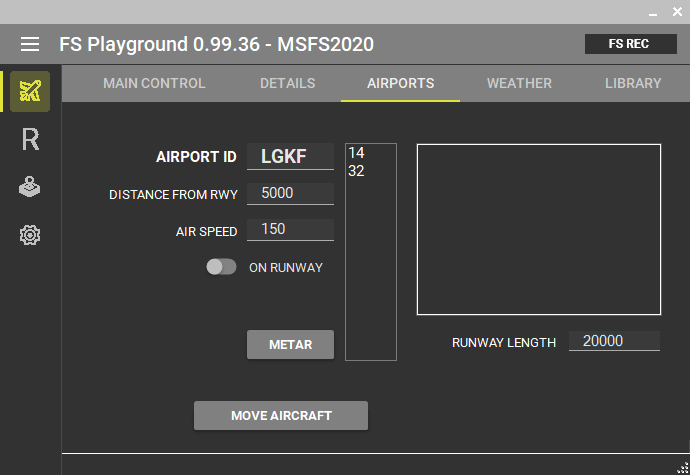
Airports
In the Airports tab (Image 9) any airport can be searched by it’s ICAO designator. The database is at the moment from open sources and many airports may not be present or very precisely located. Navigraph and maybe FS’s database is on the todo list. As you type the airport ID any matches are displayed on the results window.
Double clicking on one, will:
- Put it in the selected text box. Any information will be shown here.
- The available runways will fill the list. To actually use one, you have to double click on the desired runway. This will update the active memory position with the proper coordinates so the plane will be positioned there when moved.If the memory already contains a valid position a warning will be displayed to prevent accidental overwrite.
- The calculated position DISTANCE FROM RWY will be at a distance of 5000 feet from the runway’s threshold with the plane lined up.
- If the ON RUNWAY switch is ON, the plane will be positioned on the runway.
- The runway length RWY LENGTH works as a filter while searching. Only airports with runways shorter than this value will be shown.
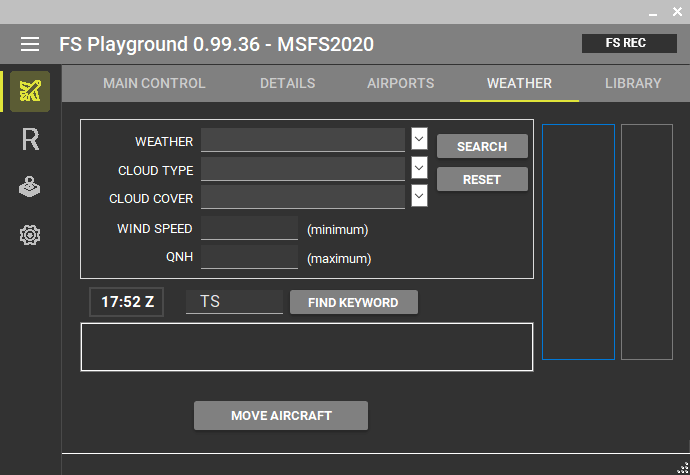
Weather
The idea of the WEATHER tab (Image 10) is to search current weather and find the worst / most interesting / peculiar, then get teleported there and enjoy. Make sure you have Live Weather active in FS.
The filters are pretty easy to operate and work in parallel. To bring results (Airports) all of them must be satisfied.
Do not forget to :
- Disable damage for your aircraft. It will be tossed around a lot.
- Activate the “Delay movement” with an appropriate delay time in options. It gives FS a chance to create the missing ground on long jumps.
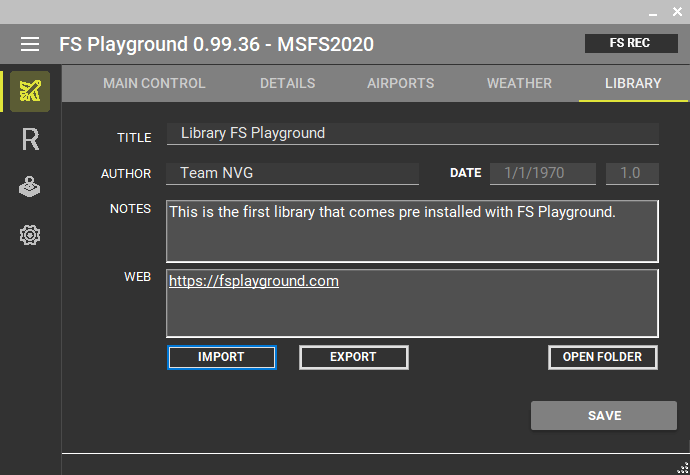
Library
The LIBRARY tab (Image 11) is where all 40 memories get:
- The library’s TITLE
- The library’s AUTHOR
- The DATE of the library’s creation and version
- NOTES field for notes that are relevant to the library
- WEB field for the web links that are relevant to the library
- IMPORT button imports a library
- EXPORT button exports the library
FS Playground always works with a library file named defaultLib.pgl. Any changes you make will end up in this file. The file must be exported to any other desired filename. The default folder for FS Playground libraries is called FSplayground and is inside the user’s Documents folder. It will be opened in a windows file browser by clicking the OPEN FOLDER button.