
Website is under construction
Our manual is in the making. Here you will find the on-line version.
A pdf version will be also available soon. To watch our video tutorial here.
Introduction
Microsoft’s new Flight Simulation 2020 came years after the previous version and introduced a world that is worth exploring. Even the default scenery is way better than previous generation expensive projects. Such a world needs exploration, taking notes and sharing. This is where our position library comes handy.
And since you will be visiting interesting places and making daring landings, why not time travel and watch it again and again? Change weather, time of day, cameras, start making content. Our replay system lets you do that as well.
The third offering is kind of an outfit, but we had it and we use it, so think of it as a freebie. Because Force feedback makes the experience even better. Try it with VR. If you have that old FF2, it’s now time to use it again.
FS Playground existed for many years on our hard drives. Now there is a world to release it to. We hope that you will enjoy it as much as we have
General Description
FS Playground strives for a simple and modern user interface without sacrificing functionality. Color theming is supported.
It features four main screens plus an extra window for the Replay control (refereed as “replay controller”).
As the program evolves more pages may be added for the extra functionality.
All settings are applied and saved automatically. In some occasions a “validate” (to keep the FS term) user operation may be required.
Operation
Replay System
While running, FS Playground is in constant communication with the Flight Simulator. There are two main modes, Recording and Playback.
The first thing you will have to do is disable the damage from overstretch and collision. Go to Flight Simulator –> Assistance –> Failure & Damage and disable Crash Damage and Aircraft Stress Damage.
No present airframe is able to withstand the warp speeds acceleration and deceleration that you have just gotten access to!
To start with the Replay System:
- Select a position on the map and start flying there.
- Start up FS playground; it will automatically try to connect to Flight Simulator. If set so, it will also connect to the FF joystick (see Force Feedback below).
- The general status is always indicated on the top right of the window. The status of the connection to the Flight Simulator is indicated by the FS label, the Force feedback joystick is indicated by the FF label and the recording mode is indicated by the REC label.
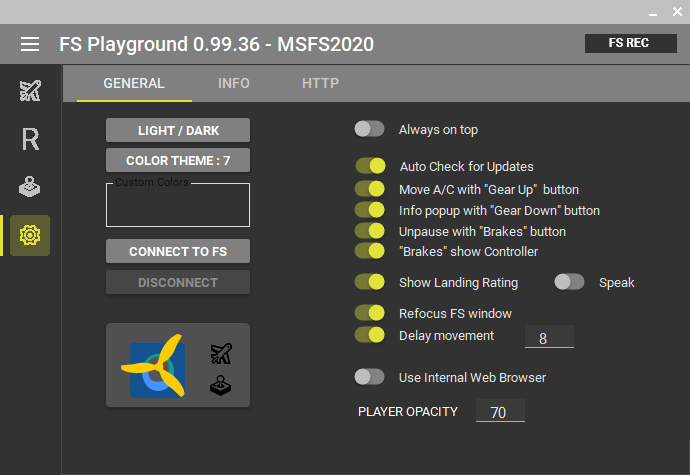
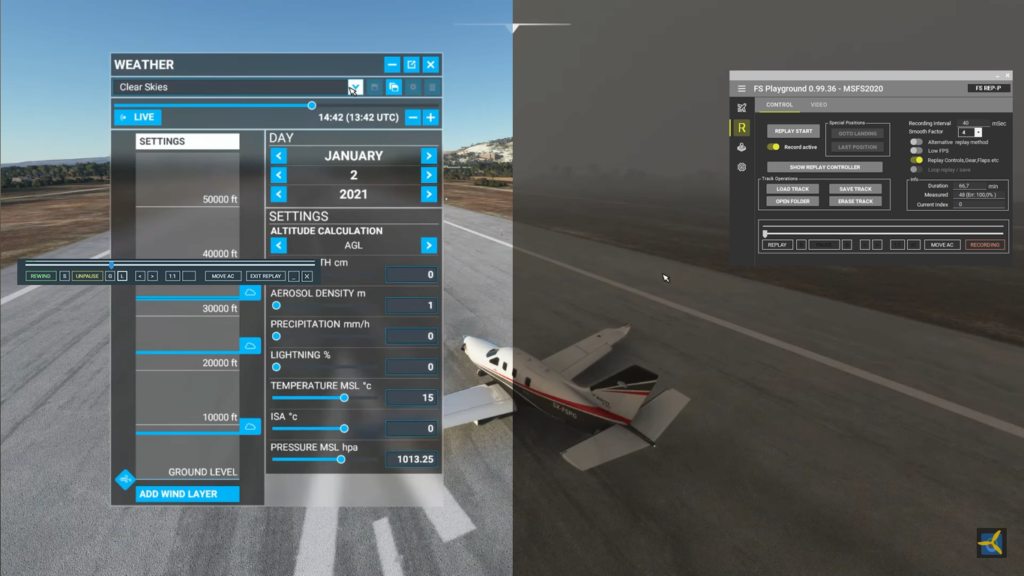
One thing that is convenient to do if you have only one monitor connected to your system, is to activate the Always on top option in the Options menu (Image 1). This will keep the FS playground windows on top of Flight Simulator.
Recording mode
The default mode is “Recording” with the position of the airplane recorded on regular time intervals. The time from update to update is set by the user (Recording Interval) and is expressed in milliseconds. It is important to find the optimum value as it will greatly affect the overall replay quality.
The last X minutes of flight are always ready for replay. This is affected by the recording interval, as the more frequent the recordings, the less time will fit in the pre-allocatted track memory. The calculated time is shown in the Duration text field.
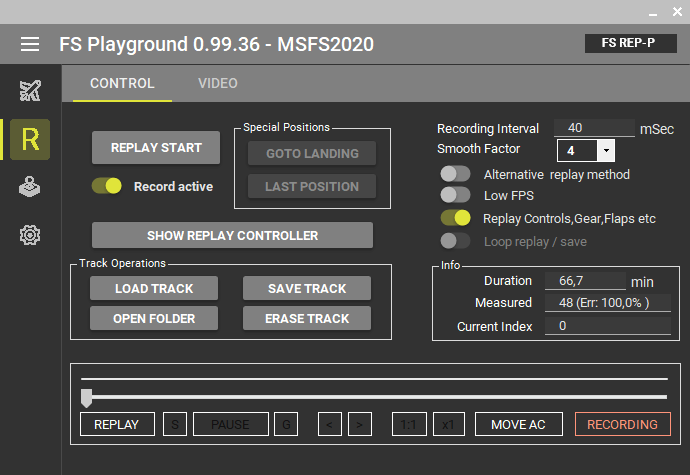
Optimizing recording interval
Recording Interval is how often the recorder takes the position from fs and saves it to the track. Obviously the more frequent the smother the playback. But going at a faster pace than your system can support causes jitter and errors. A good starting point for a fairly fast PC is about 40 mSeconds.
While recording, the achievable time interval is displayed in the Measured text box. It is also indicating the amount of errors during recording. This counter should be close to 0 and not increasing significantly. You will have to experiment to find the sweet spot for your system.
The replay rate is doubled if the smooth playback is active. This may also ask too much from your system so you will have to experiment.
Slow motion
To use the Slow motion:
- Load a track or create one
- Enter Replay Mode
- On the replay controller, move the playhead marker to the point in time that will be the beginning of the slow motion replay
- Click on the 1:1 button. This will cycle through 1:2, 1:4 and 1:8 speeds.
- To return to normal speed click on the x1 button.
A couple of things to note:
- To move to another position and start the slow motion replay go into 1:1 speed (x1 button) , drag the play head to the new position and reactivate slow mode replay (1:1 button).
- Every time you change the replay speed the aircraft is moved to the position in the 1:1 speed.
- During slow motion, some controls are disabled namely “Alternative replay method” and “Low FPS“. Exit to x1 speed to change them.
In Flight Simulator
When recording in landing at the moment of touchdown the Vertical Speed, Side Slip, Banking and Pitch will be shown on the notification area at the bottom left of the FS Playground window (Image 3).
Also, a few seconds later and if the Speak landing rating option (Image 1) is active, the text to speech engine will speak the first two parameters. This is especially useful if you fly in VR.
Once on the ground the landing rating may be shown again by engaging your gear up button on your joystick.
There is one, kind of funny feature that is included in fs playground. In the Main Control tab of the Aircraft Control screen. The Touchdown freeze switch (Image 6) will stop the simulator the moment the wheels touch down. It was a small experiment during development and is not related to the replay system which offers similar functionality. But it was way too funny so we left it there.
You will have to press un press to continue or you can just press the wheel brakes joystick button.
Replay mode
In replay mode, FS Playground acts as a video player, but instead of playing back video, it replays the recorded track by positioning the aircraft in Flight simulator.
In Flight Simulator
On the main window select the Replay screen (Image 2) and click on the REPLAY button. Now you are in replay mode. The top right of the screen shows the REC label and the airplane is moved to the beginning of the recorder track, replaying the flight.
One important thing to notice is the Smooth playback switch. Activating this option, doubles the reproduced frames by using interpolation. Make sure that your computer can handle the increased work load.
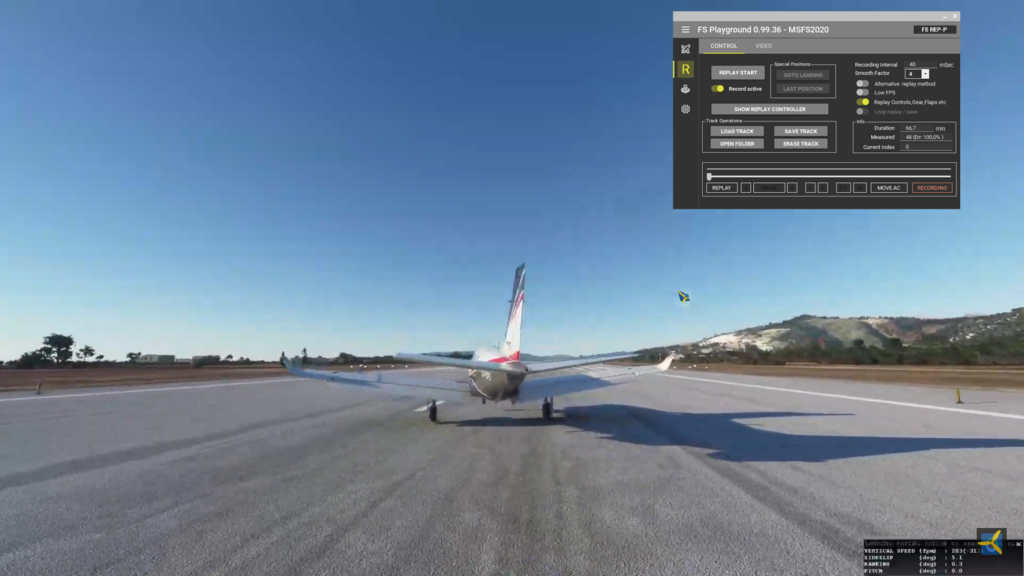
Outside views
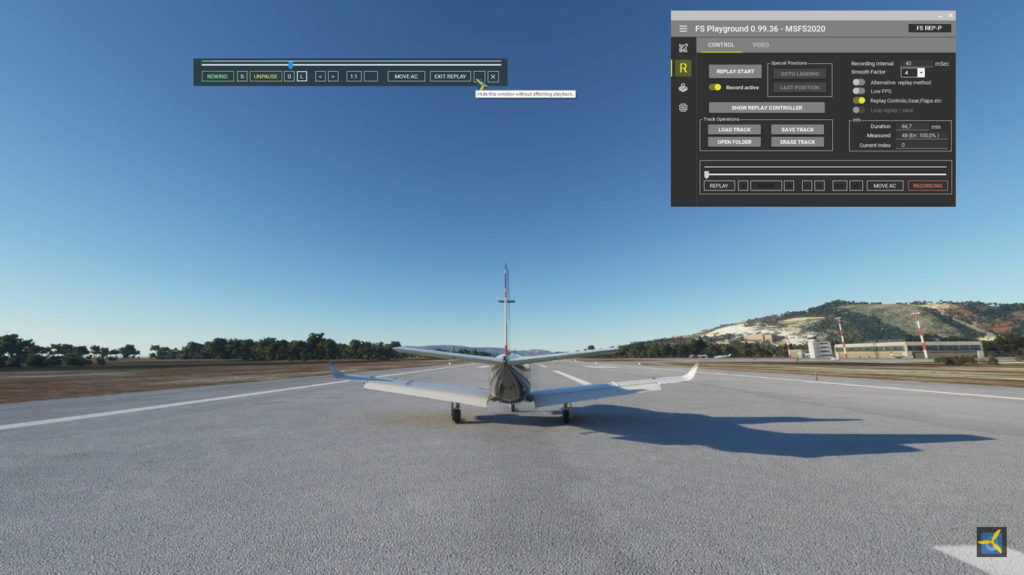
Quite interesting is the drone camera as it can be set up in all the interesting points and to enjoy the views. When landing by clicking on the GOTO LANDING button (Image 2) takes you to the moment that the aircraft’s gear touched down for the first time. The replay is now paused. Use the timeline marker to move back and forth in time and change the weather, the time of the day etc. and still enjoy the same flight (Image 4).
Replay controller
During replay the user may use the Replay controller window (Image 5) consisting of the main timeline, playback bug and a few other controls. This window stays always on top and has user controllable transparency (set in the Options screen, Image 2) to be as non intrusive as possible.
In Flight Simulator
If set in the Options, pressing the joystick button for wheel brakes will popup the Replay controller window.
The replay controller has the following keys:
- REPLAY button will start the replay from the beginning.
- PAUSE / Unpause button will start or pause the replay.
- The S and G buttons stand for the Save and Goto commands. A temporary memory is used and by pressing the S button the current plane position and attitude will be saved. Pressing G, will move the aircraft to the saved position, if we have moved to another time – position. This is a quick and easy way to capture or enjoy interesting clips of your flight.
- While paused with the use of Next [>] and Previous [<] buttons you can move one saved point at a time.
- The Minimize button [-] to the other side of the controller window, will hide the controller.
- The Close button [X] will not only close the controller window, but it will also exit Replay mode.
- The MOVE AC (Move Aircraft) button, will exit replay mode and return the aircraft to the selected memory from the main window.
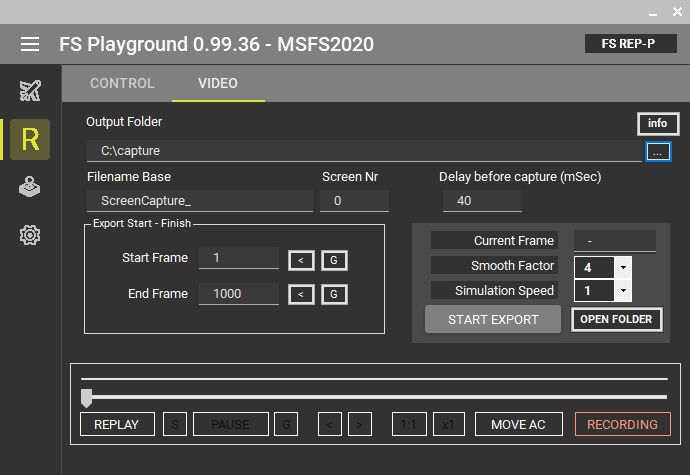
Video Recording
The Video tab in the Replay screen is for advanced video producers and creates sequences of pictures for importing to video editing software. This gives full control to video editing of quality, zero jitter (assuming the track was captured with no jitter) and frame by frame export. It eliminates the need for video capturing software. It is a big subject that some will find extremely interesting.
A couple of technical clarifications:
- The frame by frame export will only reproduce whatever the track has captured. Make your tracks with the lowest possible graphical settings and the highest fps. Then save it and replay it with high rendering quality during playback.
- The fact that we chose to produce captured frames and not video, is because it is how the professional producers work. Transforming picture sequences to video in professional software gives full control to the video editor. Still, for the casual user, a video encoder of some sort is on the list, but with low priority.
- We are not exporting a lot of aircraft system’s data, not because it cannot be done, it is very easy to have them by the thousands; it is because the end goal is to have a balance between your fps and visual quality.
To use the frame by frame export:
- Record a track and save it
- Go into Replay mode and use the replay controller to select start and end frames
- Make sure your Export folder is available, selected and empty
- Choose an appropriate base filename.
- Set the “Delay before capture” to reflect your system’s capabilities, 30 to 40 msec is a good starting point.
- Select 2X if you want double frames (interpolated) than the ones recorded (same with smooth playback, in fact they are the same control)
- Press “Start export” button.
- Once finished, import the images as a sequence to your editing software, set the duration and you are all set.